A heart cake is more than just a dessert—it’s a symbol of love and care, perfect for celebrating life’s most heartfelt moments. Whether you’re preparing for Valentine’s Day, a romantic anniversary, or simply surprising a loved one, mastering this recipe will leave a lasting impression. With step-by-step instructions, tips for perfect frosting, and ideas for decoration, this guide will ensure your heart-shaped cake becomes a show-stopping centerpiece.
Table of contents
What You’ll Need for Making a Heart Cake
Crafting a heart cake requires both creativity and the right tools. To set yourself up for success, gather all the ingredients and equipment before you start. Below is a complete list of what you’ll need.
Ingredients for the Cake
| Ingredient | Amount | Notes |
|---|---|---|
| All-purpose flour | 2 ½ cups | Gluten-free substitutes work well too |
| Granulated sugar | 1 ¾ cups | Adds sweetness and texture |
| Baking powder | 1 tablespoon | Creates a light, fluffy consistency |
| Salt | ½ teaspoon | Enhances flavors and balances sweetness |
| Eggs | 4 large | Room temperature for best results |
| Whole milk | 1 cup | Adds richness and moisture |
| Unsalted butter | 1 cup | Soften at room temperature |
| Vanilla extract | 1 teaspoon | Deepens the flavor profile |
| Food coloring | As desired | Pink or red for a festive look |
| Buttercream frosting | 2 cups | Recipe for homemade frosting below |
Essential Tools
- Heart-shaped cake pan: Alternatively, use two round cake pans to form the shape manually.
- Mixing tools: Stand mixer, large mixing bowl, and spatula.
- Piping bags: Use with decorative tips for elegant frosting.
- Cooling rack: Essential for evenly cooling the layers.
- Serrated knife: For trimming and shaping, if not using a heart pan.

How to Prepare the Cake Layers
Preparing the layers is the foundation of your heart cake. This step requires precision and patience to ensure your cake bakes evenly and maintains its structure.
Step 1: Preparing the Batter
Start by gathering all your ingredients to ensure a smooth workflow. Preheat your oven to 350°F (175°C) and prepare your cake pans by greasing them with butter or nonstick spray. If you’re using round pans, line them with parchment paper for easy removal.
- In a large bowl, beat the softened butter and granulated sugar together until the mixture becomes light and fluffy. This step is crucial for achieving a tender cake texture.
- Add the eggs one at a time, mixing well after each addition. Stir in the vanilla extract to enhance the aroma and depth of flavor.
- In a separate bowl, whisk together the dry ingredients: flour, baking powder, and salt. Gradually fold the dry ingredients into the wet mixture, alternating with the milk. Mix until the batter is smooth but avoid overmixing to prevent a dense cake.
Pro Tip: If you’re using food coloring, add it during the mixing stage to ensure even color distribution. For a classic pink heart cake, 4–5 drops of gel food coloring should suffice.
Step 2: Baking the Layers
- Divide the batter evenly between the prepared pans, smoothing the tops with a spatula. If using two round pans, aim for equal thickness to simplify shaping later.
- Place the pans in the preheated oven and bake for 25–30 minutes. Check for doneness by inserting a toothpick into the center; it should come out clean.
- Once baked, let the cakes cool in their pans for 10 minutes. Then, transfer them to a cooling rack to cool completely.
Step 3: Shaping the Heart
If you don’t have a heart-shaped pan, follow these steps to create the design manually:
- Use a serrated knife to cut a semicircle from one side of each round cake. This will form the top curves of the heart.
- Assemble the pieces on a cutting board or cake board. Attach the cut pieces with a thin layer of frosting to hold them in place.
- Trim any uneven edges to create a smooth and symmetrical heart shape.
Mastering the Crumb Coat
A crumb coat is a thin layer of frosting applied before the final decoration. It locks in loose crumbs, creating a smooth base for the main frosting layer.
- Using an offset spatula, spread a thin, even layer of buttercream over the entire surface of the cake. Pay special attention to the edges to prevent crumbs from showing through.
- Place the cake in the refrigerator for 20–30 minutes to set the crumb coat. This step ensures the final layer of frosting applies smoothly.
Pro Tip: If you notice gaps or cracks in the crumb coat, apply a second thin layer to fill them in before refrigerating.
For more tips on baking techniques and creative cake ideas, visit our blueberry dump cake recipe. This guide offers valuable insights into achieving consistent textures in desserts.
Frosting Like a Pro
Buttercream frosting is not only delicious but also versatile. Here’s how to make and apply it like a professional.
Step 1: Making the Buttercream
- In a stand mixer, beat 1 cup of softened butter until creamy and smooth. Gradually add powdered sugar, one cup at a time, mixing on low speed to prevent a sugar cloud.
- Add 1 teaspoon of vanilla extract and a pinch of salt to balance the sweetness. If the frosting is too thick, mix in a tablespoon of milk until you achieve your desired consistency.
- If using food coloring, divide the frosting into bowls and add a few drops to each, mixing until the color is uniform.
Step 2: Applying the Frosting
- Remove the cake from the refrigerator and apply the first layer of frosting over the crumb coat. Use a spatula to spread the frosting evenly across the top and sides.
- Smooth the surface by running the spatula under hot water, then wiping it dry before gliding it over the frosting.
For more decoration inspiration, check out our cookie cake recipe, which showcases creative ways to pipe frosting and add flair to your cakes.
Decorating the Heart Cake
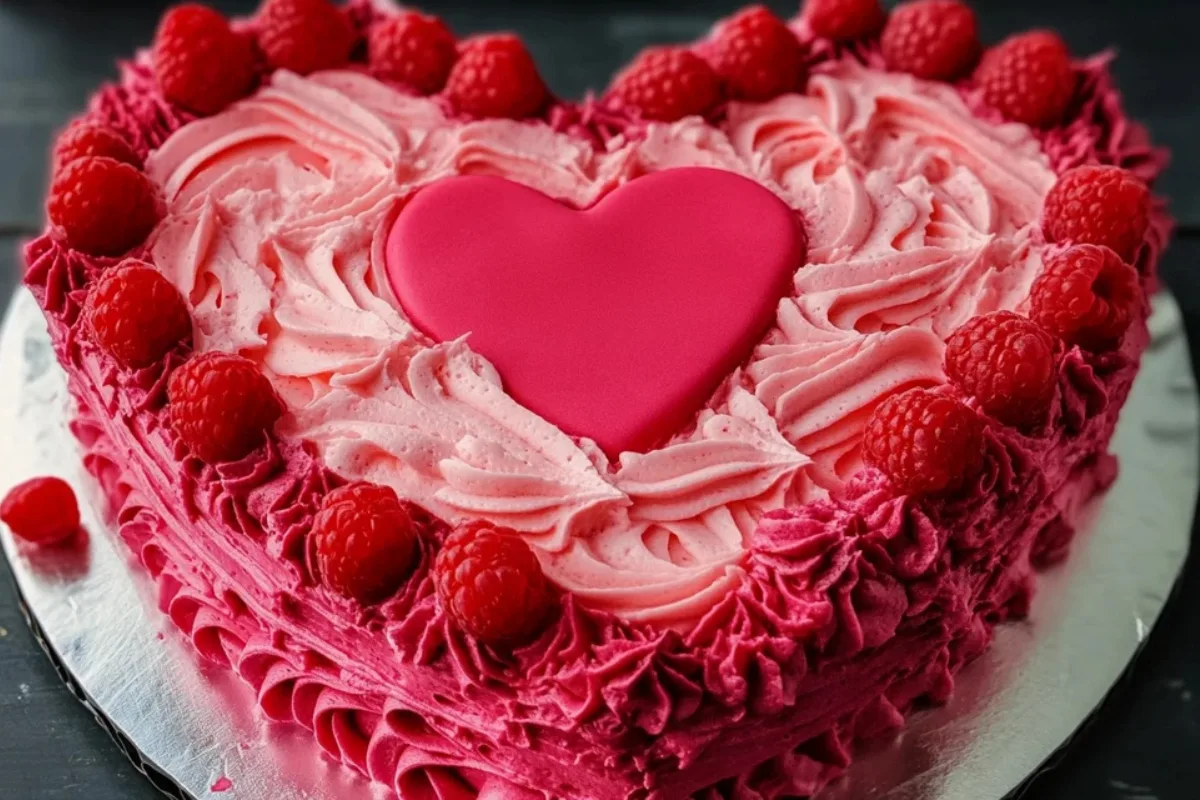
The decoration stage is where your heart cake truly shines. Use a piping bag with a small star or shell tip to create borders along the edges. Add visual interest with fresh berries, chocolate curls, or edible glitter.
Pro Tip: Create a gradient effect by layering two shades of frosting. Start with a darker tone at the base and lighten the color as you move upward.
Decorating the Heart Cake: A Creative Finish
The decoration stage is where your heart cake transforms from delicious to dazzling. With the foundation of a smooth frosting layer, you now have the perfect canvas to add artistic touches. This section provides techniques and ideas to elevate your cake’s presentation and leave a lasting impression.
Selecting the Right Piping Techniques
Decorating with buttercream is an art, and using the right tools makes all the difference. Begin by choosing piping tips that match your design goals. Star tips create beautiful swirls, while round tips are ideal for writing or delicate dots.
- Shell Borders: Use a shell piping tip to frame the edges of your cake. This classic design adds a polished look and enhances the heart shape.
- Floral Accents: Create buttercream flowers in various sizes and colors. A rose or petal tip works best for floral designs, adding elegance and charm.
Pro Tip: Practice your piping designs on parchment paper before applying them to the cake to perfect your technique.

Finishing Touches
Now it’s time to personalize your heart cake with unique decorations. Small details can make a big difference, so consider adding elements that complement the occasion.
- Edible Decorations: Top your cake with edible pearls, sprinkles, or glitter to catch the light and create a festive appearance.
- Fruit Garnishes: Arrange fresh berries like raspberries or strawberries along the borders for a vibrant, natural accent.
- Chocolate Shavings: Add a layer of sophistication by grating dark chocolate over the cake.
Pro Tip: For a romantic theme, use red or pink fondant to cut out heart shapes and arrange them across the surface of the cake.
For more intricate decorating techniques, explore our guide to Madeline cookies cream cake. It features tips for creating visually stunning dessert presentations.
Pro Tips and Creative Variations
A heart cake doesn’t have to follow the same formula every time. You can adapt this recipe to suit different occasions and tastes with a few creative tweaks.
Flavor Enhancements
- Zesty Lemon Raspberry: Add lemon zest to the batter and a layer of raspberry jam between the cake layers for a tangy and sweet combination.
- Decadent Chocolate Ganache: Drizzle chocolate ganache over the top of the cake for a rich, glossy finish.
- Vanilla Bean Delight: Incorporate real vanilla bean paste into the frosting for an elevated flavor profile.
Design Variations
- Ombre Frosting: Create a gradient effect with varying shades of frosting. Start with the darkest color at the base and gradually lighten as you move up the cake.
- Mini Heart Cakes: A cookie cutter shapes smaller heart cakes for individual servings. Decorate each one uniquely for a personalized touch.
How to Store and Serve Your Heart Cake
Preserving the freshness of your heart cake ensures that every slice is as delicious as the first. Proper storage and serving tips are essential for maintaining its quality.
Storage Tips
- Refrigeration: If you plan to serve the cake within three days, store it in an airtight container in the refrigerator. This prevents the frosting from drying out.
- Freezing: For longer storage, wrap individual slices in parchment paper and place them in a freezer-safe container. Thaw in the refrigerator before serving.
Pro Tip: Avoid storing decorated cakes near strong-smelling foods in the refrigerator, as the frosting can absorb odors.
Serving Suggestions
Bring the cake to room temperature before serving for the best texture and flavor. Slice with a clean, sharp knife, wiping it between cuts to maintain the presentation.
For more tips on storing baked goods, visit our guide on how to store no-bake caramel pretzel crack bars. It provides practical advice for preserving desserts.
Crafting a Vintage Heart Cake
A vintage heart cake is a timeless design that evokes feelings of nostalgia and elegance. This classic style is ideal for weddings, anniversaries, or any special occasion that calls for a romantic touch.
Design Elements of a Vintage Heart Cake
- Lace Patterns: Use a piping bag with a Wilton Tip 3 to create delicate lace-like patterns around the edges of the heart-shaped cake.
- Muted Colors: Opt for pastel shades such as light pink, lavender, or mint green to achieve a vintage aesthetic. Mix berry powder into your frosting for natural, soft hues.
- Edible Flowers: Top the cake with edible flowers like violets or roses for a sophisticated finish.
Step-by-Step Guide to Making a Heart-Shaped Cake
This section guides you through the process of forming and frosting a perfect heart-shaped cake.
Step 1: Preparing the Cake Layers
- Start with two 8-inch round cake layers and trim one to form the pointed bottom of the heart.
- Use the trimmed pieces to create the rounded top of the heart and assemble them with frosting.
Step 2: Frost the Cake Smoothly
- Begin by applying a crumb coat to lock in crumbs and create an even surface.
- Spread a little extra frosting on the sides and top to ensure smoothness. Use an offset spatula for precision.
Pro Tip: Let the frosting chill for at least 20 minutes before adding the final layer.
Using Food Coloring for Unique Designs
Food coloring adds vibrancy and personality to your heart-shaped cake. Here’s how to use it effectively.
- Gradient Effects: Blend darker pink at the base and lighten the shade as you move upward for an ombre look.
- Creative Patterns: Use separate bowls to mix different colors and create marbled effects in your frosting.
- Natural Colors: Consider using berry powder for natural shades that pair beautifully with a vintage theme.
How to Frost the Cake for Perfection
Frosting a cake evenly requires attention to detail. Follow these steps to achieve a flawless finish.
Step1: Apply the Crumb Coat
- Spread a thin layer of frosting across the surface to lock in crumbs.
- Chill the cake for 20 minutes to set the crumb coat.
Step2: Final Frosting
- Use an angled spatula to frost the sides and top of the cake smoothly.
- Repeat the process as needed to cover any gaps or uneven areas.
Step3: Add Borders and Accents
- Pipe a shell border around the bottom and top edges of the cake for a polished look.
Pro Tip: Use whatever piping tip best suits your design for personalized details.

Storing the Frosted Cake
Proper storage is crucial to maintain the freshness and appearance of your frosted cake.
- Short-Term Storage: Store the frosted cake in an airtight container in the refrigerator for up to three days.
- Long-Term Storage: Freeze individual slices wrapped in parchment paper for up to two months.
Perfecting a Chocolate Heart Cake
A chocolate heart cake is a decadent choice for any celebration. Its rich flavor pairs beautifully with buttercream frosting and fresh berries.
Elyseyouness.kazzoul@gmail.comEdit Profile
Making the Cake Batter
- Combine dry ingredients in one bowl and wet ingredients in another.
- Gradually mix the wet ingredients into the dry ingredients until well combined.
Layering the Cake
- Place the first cake layer on a cake board and spread a generous amount of frosting.
- Add the second cake layer on top and repeat the process.
Pro Tip: Chill the cake between layers for easier assembly.
Reader Interactions: Share Your Heart-Shaped Creations
Engage with other baking enthusiasts by sharing photos and tips from your experience. Use hashtags like #HeartCake or #VintageBakes to connect with a community of like-minded bakers.
Pro Tip: Host a poll or Q&A session on social media to gather ideas for your next cake design.
FAQs
How do I form a heart shape without a special pan?
Cut an 8-inch round cake into sections and reassemble them to form the rounded top and pointed bottom of a heart.
What’s the best way to frost a heart-shaped cake?
Apply a crumb coat, chill the cake for at least 20 minutes, and then frost the sides and top with an angled spatula for a smooth finish.
How do I store the frosted cake?
Keep the frosted cake in an airtight container in the refrigerator for up to three days. For longer storage, freeze slices individually.
How do I cut a round cake into a heart shape?
Cut a semicircle from the top of one round cake to form the heart’s point. Use the removed pieces to create the curves at the top. Frost to smooth the edges.
What frosting works best for heart cakes?
Buttercream is ideal for heart cakes due to its smooth texture and versatility. For a tangy twist, use cream cheese frosting.
Can I use a box cake mix for this recipe?
Absolutely! A box cake mix is a convenient alternative that still produces a delicious result. Customize it with added flavors like vanilla or lemon zest.
How do I fix a broken cake layer?
Use frosting as an edible glue to reassemble the broken pieces. Apply a crumb coat to stabilize the structure before final frosting.
How can I make the frosting smooth?
Heat a spatula in warm water, dry it, and gently glide it over the frosting. This technique smooths out imperfections for a professional finish.
What’s the best way to transport a decorated cake?
Place the cake in a secure cake box and keep it flat during transport. Avoid placing it near heat sources to prevent melting.
Print
Heart Cake: A Delightful Bakery Tutorial
Description
A heart cake is a symbol of love, perfect for Valentine’s Day, anniversaries, or any special occasion. This step-by-step guide shows you how to bake, frost, and decorate a stunning heart-shaped cake. With creative tips and variations, you’ll create a dessert that’s not only delicious but also a heartfelt masterpiece.
Ingredients
For the Cake:
- 2 ½ cups all-purpose flour (or gluten-free substitute)
- 1 ¾ cups granulated sugar
- 1 tablespoon baking powder
- ½ teaspoon salt
- 4 large eggs (room temperature)
- 1 cup whole milk
- 1 cup unsalted butter, softened
- 1 teaspoon vanilla extract
- Food coloring (pink or red, as desired)
For the Buttercream Frosting:
- 1 cup unsalted butter, softened
- 4 cups powdered sugar
- 1 teaspoon vanilla extract
- 2–3 tablespoons milk (for consistency)
- Food coloring (optional for decoration)
Optional Decorations:
- Edible glitter or sprinkles
- Fresh berries (raspberries, strawberries, etc.)
- Chocolate shavings
Instructions
Step 1: Prepare the Cake Batter
- Preheat the oven to 350°F (175°C). Grease and line your heart-shaped cake pan (or two 8-inch round pans for manual shaping).
- In a large mixing bowl, cream the softened butter and granulated sugar until light and fluffy.
- Add the eggs one at a time, mixing well after each addition. Stir in the vanilla extract.
- In a separate bowl, whisk together the flour, baking powder, and salt. Gradually mix the dry ingredients into the wet ingredients, alternating with the milk.
- Add food coloring for a festive touch (4–5 drops of pink gel coloring recommended).
Step 2: Bake the Cake
- Divide the batter evenly into prepared pans. Smooth the tops with a spatula.
- Bake for 25–30 minutes, or until a toothpick inserted into the center comes out clean.
- Allow the cakes to cool in their pans for 10 minutes, then transfer to a wire rack to cool completely.
Step 3: Shape the Cake (if not using a heart pan)
- Cut one round cake into a semicircle to form the bottom point of the heart.
- Use the cut pieces to create the rounded top curves, securing them with a thin layer of frosting.
- Trim any uneven edges to refine the shape.
Step 4: Apply the Crumb Coat
- Spread a thin layer of buttercream frosting over the entire cake to lock in crumbs.
- Chill the cake in the refrigerator for 20–30 minutes to set the crumb coat.
Step 5: Frost and Decorate
- Prepare the buttercream by beating softened butter in a stand mixer until creamy. Gradually add powdered sugar, vanilla extract, and milk to achieve the desired consistency.
- Apply the final layer of frosting, smoothing it with a spatula.
- Use a piping bag with decorative tips to add borders, flowers, or other designs.
- Decorate with fresh berries, edible glitter, or chocolate shavings for a dazzling finish.
Notes
Preparation Time:
30 minutes
Cooking Time:
30 minutes
Total Time:
1 hour
Serving Size:
12 servings
Yield:
1 heart-shaped cake
Cuisine:
American
Course:
Dessert
Nutrition Information (per serving):
- Calories: 320
- Fat: 15g
- Carbohydrates: 42g
- Protein: 4g
Featured Image:
A beautifully decorated heart-shaped cake with smooth pink buttercream frosting, adorned with fresh berries, chocolate shavings, and edible glitter.
Additional Notes:
- To create an ombre effect, use varying shades of pink frosting, starting darker at the base and lightening toward the top.
- Store the cake in an airtight container in the refrigerator for up to 3 days.
- For a rich chocolate heart cake, substitute ½ cup of flour with cocoa powder.
Conclusion
Creating a heart cake is more than just baking—it’s an opportunity to express love and creativity through a visually stunning and delicious dessert. Whether you choose a vintage-inspired design or a modern twist, mastering the basics of frosting, coloring, and decorating allows you to craft a personalized masterpiece. With endless possibilities for flavors and presentation, your heart cake will undoubtedly become a memorable centerpiece for any special occasion, leaving a lasting impression on everyone who sees and tastes it.
Want to see more? If you enjoyed this article, we invite you to join us on our Facebook page ElyseRecipes. That way, you’ll be among the first to hear about our updates, cooking tips, and recipe ideas! Come share your passion and connect with our community.


