
Whimsical, fun, and absolutely delicious, Lorax cookies are the perfect treat to bring a smile to everyone’s face. Whether you’re celebrating Earth Day, Dr. Seuss’ birthday, or simply looking for a creative baking project, this Lorax cookie recipe is your go-to guide. Packed with vibrant colors, playful designs, and a dash of sweetness, these cookies are perfect for kids and adults alike. They taste amazing and serve as a fun activity to enjoy with your family.
Ingredients and Tools for Lorax Cookies
Before diving into the step-by-step process, let’s prepare all the essentials. Having everything ready will make the process seamless and enjoyable.
Ingredients
The secret to creating the perfect Lorax cookies is simple yet versatile sugar cookie dough. Below is a complete list of ingredients required for this recipe:
| Ingredient | Amount | Notes |
|---|---|---|
| All-purpose flour | 2 ½ cups | Sift for a smoother dough |
| Unsalted butter | 1 cup (softened) | Ensures a rich and creamy texture |
| Granulated sugar | 1 cup | Balances sweetness and structure |
| Vanilla extract | 1 tsp | Adds a hint of flavor complexity |
| Eggs | 1 large | Helps bind all the ingredients together |
| Food coloring | Orange, yellow | Brings the Lorax to life |
| Candy eyes | 1 pack | Creates an expressive Lorax face |
| Royal icing | As needed | Essential for decorating |
Tools You’ll Need
Having the right tools is just as important as the ingredients to achieve the perfect look and taste for your Lorax cookies.
- Mixing bowls: These are used to combine wet and dry ingredients.
- Electric mixer: Speeds up the creaming process for butter and sugar.
- Rolling pin: Helps in rolling out the dough evenly.
- Cookie cutters: Round shapes for Lorax’s face and creative shapes for variations.
- Piping bags: Enables precision when decorating.
- Wax paper: Prevents sticking during dough rolling.
- Toothpicks: Perfect for adding fine details to the design.
Step-by-Step Instructions for the Lorax Cookie Recipe
1. Preparing the Dough
To begin, combine softened butter and granulated sugar in a mixing bowl. Use an electric mixer to cream them together until the mixture turns light and fluffy. Next, beat in the egg and vanilla extract, ensuring everything is well combined.
Gradually add the sifted flour, mixing quickly until a smooth dough forms. Once the dough is ready, divide it into two portions. Add orange food coloring to one half and yellow food coloring to the other. Knead gently until the colors are evenly distributed. Wrap both portions in plastic wrap and refrigerate for at least 30 minutes to firm up.
2. Shaping and Baking the Cookies
After chilling the dough, roll it out between two sheets of wax paper to a thickness of about ¼ inch. A round cookie cutter shapes the cookies and arranges them on a parchment-lined baking sheet. Preheat the oven to 350°F (175°C) and bake the cookies for 10-12 minutes or until their edges are golden brown.
Pro Tip:
To maintain the softness of your cookies, avoid overbaking. The edges should just begin to turn golden.
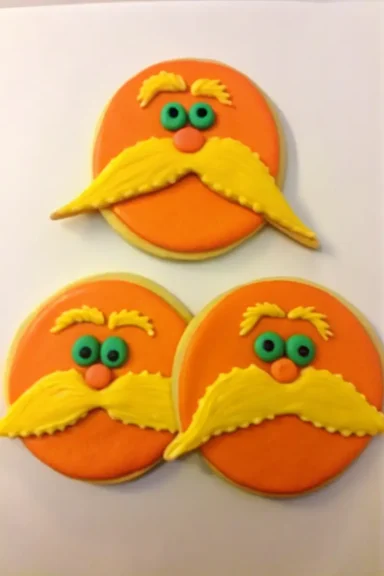
3. Decorating Lorax Cookies Like a Pro
This is where your creativity takes center stage! Decorating Lorax cookies is a fun and rewarding process. Start by preparing royal icing in two colors—orange for the base and yellow for the mustache and eyebrows. Use gel food coloring for vibrant hues.
Step-by-Step Decoration Guide
- Base Layer: Cover the round cookies with a smooth layer of orange royal icing. Allow the icing to set slightly before moving to the next step.
- Add Details: Pipe the yellow mustache and eyebrows using a small round tip. For precision, use a toothpick to shape the edges.
- Attach Candy Eyes: Place candy eyes onto the orange icing while it’s still wet to ensure they stick securely.
Let the decorated cookies dry completely before stacking or serving to avoid smudging.
Tips for Perfecting Your Lorax Cookie Recipe
1. Ensure Even Coloring
Use gloves to prevent staining your hands when adding food coloring to the dough. Gradually add color until you achieve the desired shade.
2. Maintain Icing Consistency
The royal icing should be thick enough to hold its shape yet smooth enough to pipe easily. Adjust with a few drops of water if it’s too thick, or add powdered sugar to thicken it.
For additional tips on achieving flawless icing, explore Colorful Ingredients in Cookie.

Fun Variations for the Lorax Cookie Recipe
Lorax cookies are versatile and can be adapted to suit various themes and occasions. Here are some creative ideas:
- Truffula Tree Cookies: Use colorful sprinkles and lollipop sticks to create whimsical truffula trees. Pair them with the Lorax cookies for a Dr. Seuss-themed platter.
- Seasonal Designs: Swap the colors to match the season. For example, use pastel shades for Easter or red and green for Christmas.
Looking for more creative cookie ideas? Check out Moon Spell Cookie Recipe.
Celebrating Dr. Seuss with the Lorax Cookie Recipe
Baking Lorax cookies is more than a simple recipe—it’s an opportunity to celebrate Dr. Seuss’ creativity and inspire children with the messages from The Lorax. These cookies are ideal for themed parties, book club gatherings, and family baking days, making them both memorable and educational.
Ideas for Dr. Seuss Parties
- Themed Storytime: Host a story session with The Lorax and serve these cookies as snacks. Their vibrant colors and whimsical designs will captivate kids and reinforce the book’s lessons.
- Interactive Baking Stations: Create a DIY cookie decorating station where children can design their own Lorax cookies. Offer toppings like candy eyes and edible glitter for extra creativity.
For more creative baking ideas, explore Mini Loaded Baked Potatoes.
Why the Lorax Cookie Recipe Is Perfect for Earth Day
Incorporating Lorax cookies into Earth Day celebrations combines fun with purpose. The Lorax emphasizes the importance of sustainability, and these cookies can serve as a springboard for meaningful conversations about protecting the planet.
Teaching Kids About Sustainability
While decorating, introduce children to eco-friendly practices:
- Reusable Tools: To minimize waste, use silicone baking mats and reusable piping bags.
- Sustainable Packaging: Package the cookies in compostable or recyclable containers when gifting them.
Reader Interactions: Sharing the Joy of the Lorax Cookie Recipe
One of the best parts of baking Lorax-themed treats is sharing the experience with others. Reader interactions often highlight the creative ways families and friends come together to bake these cookies. Whether you’re following a tutorial or creating your own version, making Lorax cookies sparks joy and creativity.
Encouraging Feedback
When readers share their own experiences, like adapting the recipe to include nutter butter cookies or experimenting with yellow candy for the mustache, it adds even more value. Pinterest boards and platforms like Sweetopia often feature these unique takes, inspiring new designs. If you’d like to showcase your creations, share a pic on social media or add your ideas to the comments section of your favorite recipe site.
Impress Your Guests with the Lorax Cookie Recipe
These cookies are sure to impress, whether you’re hosting a Read Across America Day celebration or simply treating your family. The bright orange candy and playful designs make them perfect conversation starters at any event. You can even learn how to make additional Dr. Seuss-inspired cupcakes or marshmallow-based snacks to complement your Lorax cookies.
Tips for Professional Results
Use white royal icing for fine details like the Lorax’s eyes and eyebrows for a polished look. A piping bag fitted with a #2 tip will give you control over intricate designs. If you aim to make the Lorax stand out, ensure the icing is slightly thicker for outlines and details. Thank you so much for experimenting with these techniques; they’ll help you create cookies that look professional and taste delicious.
The Creation Process: Bringing the Lorax Cookie Recipe to Life
Baking cookies inspired by Dr. Seuss is as much about the process as it is about the final result. Lorax cookies begin with mixing the dough, ensuring the right consistency for rolling and shaping. When decorating, meringue-based royal icing works wonders for achieving a smooth, glossy finish.
Step-by-Step Creation
- Start by preparing the dough according to package directions. Adding food coloring during this step ensures vibrant orange and yellow shades.
- Use cookie cutters or shape the dough by hand to form Lorax-themed designs. Insert candy eyes while the icing is still wet to keep them in place.
- For the mustache, melt yellow candy or use small marshmallow pieces to add texture. These details bring the character to life and make your cookies stand out.
Help You Create Beautiful Lorax Cookie Recipe Creations
No matter your skill level, there are countless resources to help you create cookies worthy of a Seuss-themed celebration. From icing recipes to step-by-step tutorials, the internet has guides to ensure success. Whether it’s your first attempt or your fiftieth, we’ll ensure you have everything you need to succeed.
Subscription for Baking Enthusiasts
Consider joining a baking subscription box to receive tools and ingredients that fit your needs. Many boxes include items specifically designed for themed creations, such as Dr. Seuss’s characters. These services are especially useful for busy parents who want to involve their kiddos in the kitchen without extensive preparation.
Making It Fun for Kiddos with the Lorax Cookie Recipe
Baking Lorax cookies is an engaging activity that kiddos are sure to love. The process of rolling dough, adding candy, and piping icing encourages creativity while teaching basic baking skills. Plus, it’s a great way to introduce children to the whimsical world of Dr. Seuss.
Child-Friendly Activities
- Decorating with Marshmallows: Let kids use marshmallow pieces to create fluffy truffula tree-inspired designs.
- Color Mixing: Teach children how to mix orange and yellow food coloring to achieve the perfect Lorax hues.
- Storytime Pairing: Combine baking with reading Dr. Seuss’s books to make the experience educational and fun.
Simple Adjustments for Young Bakers
If you’re working with younger children, consider using nutter butter cookies as a base. These cookies are sturdy and easy for small hands to decorate. With a little guidance, kids can create their own Lorax-inspired designs that will make them proud.
FAQs About the Lorax Cookie Recipe
How Long Do Lorax Cookies Last?
Stored in an airtight container, Lorax cookies stay fresh for up to seven days. However, enjoy the best texture and flavor within the first three days.
Can I Freeze Lorax Cookies for Later?
Absolutely! To freeze, place the cookies in a single layer inside an airtight container with parchment paper between layers. When ready to eat, thaw at room temperature for a few hours.
What’s the Best Substitute for Candy Eyes?
If candy eyes are unavailable, pipe small white icing circles and add a dot of black food gel for the pupils. Chocolate chips or raisins are other fun alternatives.
Pro Tips & Creative Variations for the Lorax Cookie Recipe
Expert Tips for Perfect Cookies
- Outline and Flood: Start by outlining the cookies with stiff royal icing before flooding them with a thinner consistency. This technique ensures clean edges and smooth surfaces.
- Drying Between Layers: Allow each icing layer to dry completely before adding details to avoid smudges and bleeding colors.
Flavor Enhancements
- Citrus Twist: Add orange zest to the dough for a subtle citrus flavor that complements the Lorax theme.
- Almond Infusion: Substitute vanilla extract with almond extract for a nutty undertone.
Learn about advanced baking techniques in How to Make Pistachio Crème Brûlée.
Conclusion: Mastering the Lorax Cookie Recipe
Lorax cookies are a delightful way to combine baking with creativity and environmental awareness. Perfect for celebrating Dr. Seuss, Earth Day, or simply for a fun family activity, these cookies offer endless possibilities for personalization. Follow this guide to create vibrant, whimsical treats that will impress and inspire.
Want to see more? If you enjoyed this article, we invite you to join us on our Facebook page ElyseRecipes. That way, you’ll be among the first to hear about our updates, cooking tips, and recipe ideas! Come share your passion and connect with our community.
Print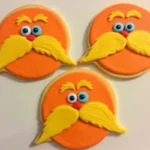
Lorax Cookie Recipe: Delightful Cookies for Every Dr. Seuss Fan
- Total Time: 42 minutes
- Yield: 24 cookies 1x
Description
Whimsical, fun, and absolutely delicious, Lorax cookies are the perfect treat for Earth Day, Dr. Seuss’ birthday, or a playful baking session. With bright colors and expressive candy eyes, they are as fun to make as they are to eat.
Ingredients
- 2 ½ cups all-purpose flour (sifted)
- 1 cup unsalted butter (softened)
- 1 cup granulated sugar
- 1 tsp vanilla extract
- 1 large egg
- Orange food coloring
- Yellow food coloring
- 1 pack candy eyes
- Royal icing (as needed)
Instructions
- Cream softened butter and sugar together until light and fluffy.
- Add egg and vanilla extract, mix until combined.
- Gradually add sifted flour and mix into a smooth dough.
- Divide dough into two portions and color one orange and the other yellow.
- Wrap dough in plastic wrap and refrigerate for at least 30 minutes.
- Roll dough to ¼ inch thickness between wax paper.
- Cut into round shapes and place on a parchment-lined baking sheet.
- Bake at 350°F (175°C) for 10–12 minutes until edges are golden.
- Prepare royal icing in orange and yellow shades.
- Decorate with orange base icing, yellow mustache and eyebrows, and candy eyes.
- Allow icing to dry completely before serving or stacking.
Notes
Use gel food coloring for vibrant hues and add orange zest or almond extract for flavor variation. Pipe icing details using a #2 tip for precision.
- Prep Time: 30 minutes
- Cook Time: 12 minutes
- Category: Dessert
- Method: Baking
- Cuisine: American
Nutrition
- Serving Size: 1 cookie
- Calories: 130
- Sugar: 9g
- Sodium: 45mg
- Fat: 6g
- Saturated Fat: 3.5g
- Unsaturated Fat: 2g
- Trans Fat: 0g
- Carbohydrates: 17g
- Fiber: 0g
- Protein: 1g
- Cholesterol: 20mg
Keywords: lorax, cookies, dr. seuss, earth day, royal icing, sugar cookies